Most traders think they lose because their strategy isn’t “good enough.” They start adding indicators, switching systems, chasing signals, and looking for the next secret setup.
The truth is simpler — and a lot more uncomfortable:
most traders blow up because they don’t control risk.
You can have a decent strategy, understand charts, and even time entries pretty well… and still slowly drain your account if your risk is inconsistent, emotional, or simply too aggressive.
If you’re completely new to scalping, it may help to read the Beginner’s Guide first, so everything in this article feels clearer and less theoretical:
Beginner’s Guide to Crypto Scalping: How It Works, Why It’s Hard — and How Traders Try to Make It Profitable
And if you already scalp but struggle with consistency, this guide will show you how risk management actually works in crypto — with simple rules you can start applying immediately.
Our goal here is not to scare you. Our goal is to help you stay in the game long enough to let your experience, pattern recognition, and discipline grow over time.
Because without risk control, even the best strategy eventually fails.
In this guide, we’ll break down practical crypto risk management strategies — not theory, not formulas you’ll never use — just clear principles you can apply before every trading session.
Let’s start by answering a simple question:
What does “risk” actually mean when you’re trading crypto?
Before we start talking about rules, stops, or position sizing, we need to clear up one big misunderstanding.
Most traders think “risk” simply means:
“How much money I might lose on this trade.”
That’s only one piece of it.
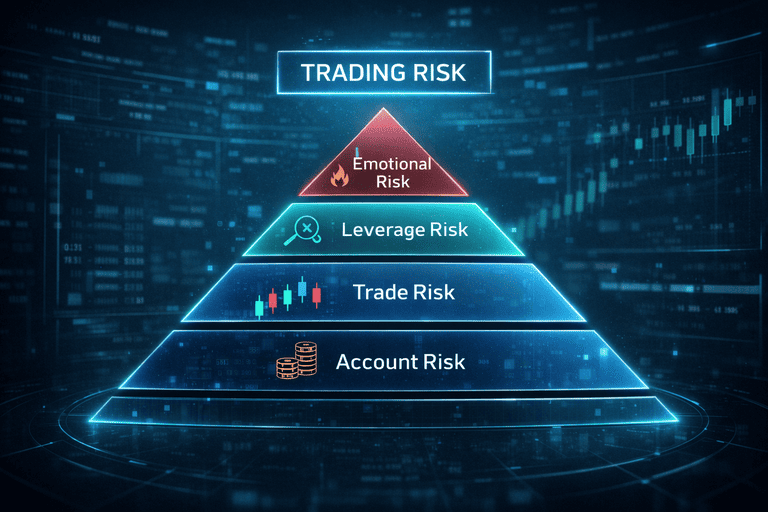
In crypto, risk is layered. You’re dealing with several types of risk at the same time — and they stack on top of each other if you’re not careful.
1. Account Risk
This is the part everyone knows: how much of your total account you are willing to lose if the trade fails.
For example, risking 1% of a $1,000 account means the most you are willing to lose is $10 on that trade.
Simple — but only if you keep it consistent.
2. Trade Risk
This is the distance between your entry and your stop loss. If your stop is very far away, the risk per trade becomes bigger — even if you didn’t notice.
This is where many scalpers get trapped: they place stops randomly and only think about the entry.
If you want to understand how entries and stops work together, the main scalping strategy guide explains it clearly: The Ultimate 1 Minute Scalping Strategy Also if 1min is to fast, you can go with 5 Minute Scalping Strategy for Crypto.
3. Leverage Risk
Leverage doesn’t magically increase profits — it increases exposure. If you don’t size positions correctly, leverage multiplies mistakes.
With poor risk control, leverage simply helps you blow up faster.
4. Emotional Risk
Probably the most dangerous one.
Fatigue, greed, boredom, revenge trading, fear of missing out… all of these push you to break your own rules. And once the rules collapse, risk explodes.
So when we say “risk,” we’re not talking about one number.
We’re talking about a system that protects you from bad trades, bad days, bad markets — and sometimes, from yourself.
Now that we know what risk really is, let’s move into the first core rule:
How much should you actually risk per trade?
If there’s one question almost every trader eventually asks, it’s this:
“How much should I risk per trade?”
There isn’t a magic number — but there is a reasonable range that has protected traders for decades across every market.
For most crypto scalpers, a realistic guideline is:
- 0.25% – 0.5% risk per trade if you are new, inconsistent, or rebuilding
- 0.5% – 1% risk per trade if you are experienced and disciplined
- Anything above 2% starts to become extremely aggressive
That means if you have a $1,000 account and you risk 1%, the maximum you are allowed to lose on a single idea is $10.
Why small percentages matter so much
Most traders blow up not because of one bad trade — but because they keep increasing risk after losses.
Lose 3 trades at 1% each? You’re down 3% — annoying, but survivable.
Lose 3 trades at 10% each? You just destroyed 30% of your account, and now every decision becomes emotional. That’s when traders start chasing losses, adding leverage, and hoping instead of thinking.
The goal isn’t to win faster — it’s to survive longer
Your edge in scalping doesn’t come from “one big win.” It comes from:
- many small, controlled trades
- tight risk when you’re wrong
- letting the math work over time
That’s why professionals talk constantly about position sizing and discipline — not secret indicators.
In the next section, we’ll turn this idea into something practical:
how to calculate your position size the right way.
Now that you know how much you’re willing to risk per trade, the next step is turning that number into an actual position size.
This is where most traders get confused — and where leverage starts tricking people into taking positions that are way too big.
Fortunately, the math is simple.
The basic position sizing formula
To size a trade correctly, you only need two numbers:
- how much you are willing to lose (your risk)
- how far your stop loss is from your entry
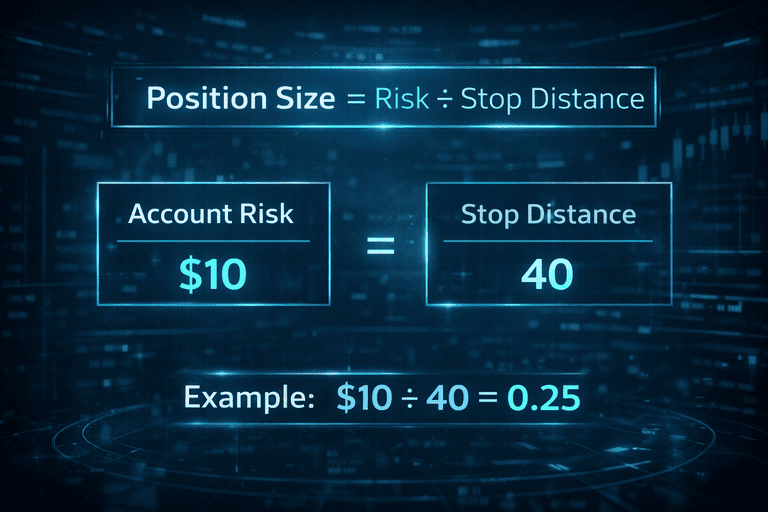
The formula looks like this:
Position Size = (Account Risk) ÷ (Stop Distance)
Let’s see it in action.
Example
Account: $1,000
Risk per trade: 1% → $10
Entry price: 40,000
Stop loss: 39,960
Your stop is 40 points away.
So your position size becomes:
$10 ÷ 40 = 0.25 per point
If the trade fails and price hits your stop, you lose the $10 you planned — not your entire account.
Why this matters more than indicators
When traders skip this step, everything becomes random:
- big size on emotional trades
- small size on good setups
- massive losses on a single mistake
That’s why two traders using the same strategy can have completely different results. One controls risk — the other guesses.
What about leverage?
Leverage does not change the formula. It only changes the margin required to open the trade.
If your position is sized correctly, leverage simply allows you to use less capital per trade — not increase risk.
If your position is too big, leverage multiplies the damage.
If you want to see how volatility changes stop distance and risk context, the main strategy pillar explains entries and stops in more detail:
Best 1-Minute Scalping Strategy
Now that your position sizing is under control, we can move to the next layer of risk:
how to use stop losses properly — without suffocating every trade.
There’s always someone online shouting:
“Real traders don’t use stop losses!”
That usually comes from people who either got lucky — or haven’t traded long enough yet.
In crypto, where price can move violently in seconds, trading without a stop loss is basically asking to blow up.
What a stop loss really is (and what it isn’t)
A stop loss is not a punishment. It isn’t “the exchange hunting your orders” or some conspiracy against you.
Your stop loss is simply:
the price level that proves your idea wrong.
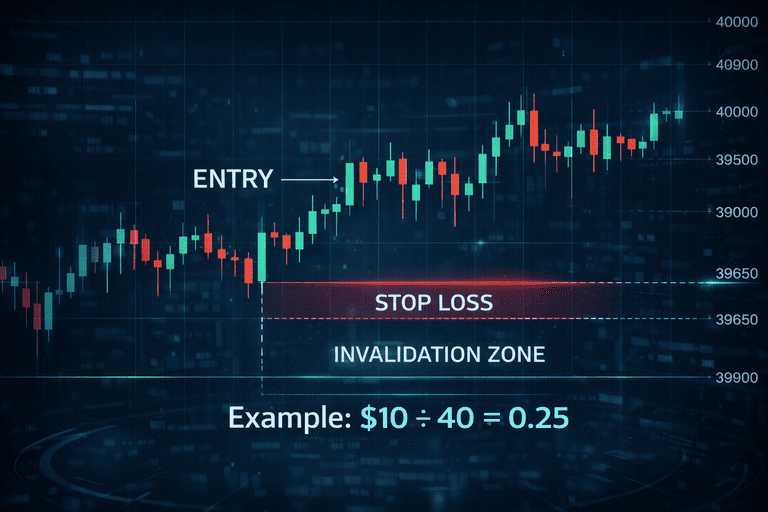
Once price reaches that area, the trade is no longer the same trade — and staying inside becomes gambling.
Two simple approaches to placing stops
1. Structure-based stops
This means placing your stop beyond a meaningful level on the chart — such as a swing high, swing low, or major support/resistance zone.
The idea is simple:
If price breaks that structure, your setup failed. Exit and move on.
2. Volatility-based stops
Here, your stop is determined by how much the market is currently moving.
For example, if volatility expands, you give trades a bit more room. If volatility contracts, you tighten risk.
Tools that help you read volatility can make this easier — but the goal is always the same:
protect your account first, chase profits second.
A common mistake: placing stops “where it feels right”
Many scalpers do this:
- enter first
- move the stop around
- hope it survives
Eventually, they remove the stop completely.
This is usually the beginning of disaster.
If you want to go deeper into how entries and stops fit inside a working plan, you can revisit the strategy guide:
The Ultimate 1-Minute Scalping Strategy Explained
With stops under control, we can now move into the next piece of risk:
deciding whether a trade is even worth taking in the first place.
Even with good stops and position sizing, there’s another question you should ask before pressing the button:
“Is this trade actually worth the risk?”
This is where risk/reward (often written as R:R) comes in. It’s not complicated — it simply compares:
how much you could lose vs how much you could realistically win.
The basic idea
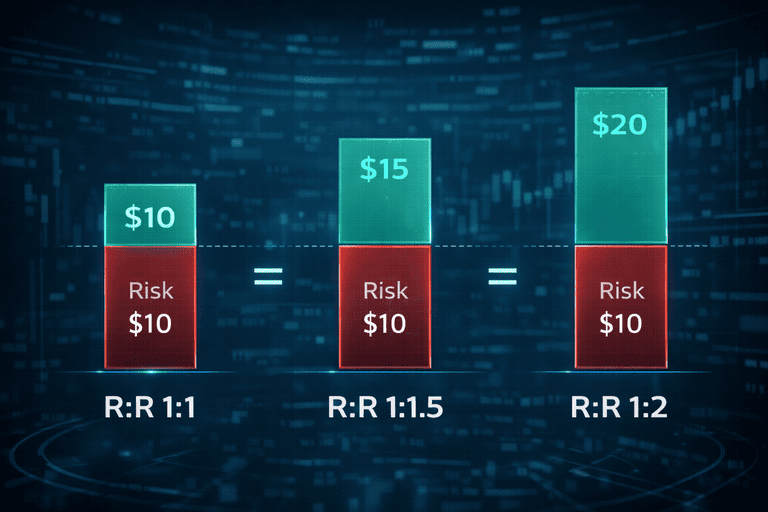
If you risk $10 to potentially make $10, that is a 1:1 trade.
If you risk $10 to potentially make $30, that is a 1:3 trade.
In theory, higher is always better — but reality is more nuanced.
Why 1:1 can still be dangerous
With a 1:1 risk/reward, you must win more than half of your trades just to break even. And when emotions kick in, most traders don’t maintain that consistency.
That’s why many scalpers feel like they’re “winning often” but somehow their account doesn’t grow.
And why 1:3 isn’t always realistic
Aiming for only huge winners sounds smart, but markets don’t always offer clean moves. Sometimes price gives smaller, controlled opportunities — and forcing massive targets leads to frustration and overtrading.
The goal isn’t extreme. The goal is balance.
A practical guideline
For most crypto scalpers, sensible targets often land around:
- 1:1.5 on choppy conditions
- 1:2 when the market is clean and trending
The key is consistency — taking trades where the potential reward clearly makes sense compared to the risk.
When risk/reward says “walk away”
Sometimes the setup looks good… but the stop needs to be wide, or the target is limited. In those moments, the smartest move isn’t to force it.
The smartest move is to pass.
You don’t need to trade every fluctuation. Protecting capital during bad conditions is part of real trading.
If you struggle with forcing trades simply because the chart is moving, revisiting your strategy foundation can help:
The Ultimate 1-Minute Scalping Strategy Explained
Now that you understand risk per trade, stop placement, and risk/reward, we can talk about something every trader eventually experiences:
drawdowns, losing streaks, and staying alive when nothing works.
No matter how good your plan is, you will eventually hit periods where nothing works.
You follow rules, you stay patient — and price still keeps tagging your stop.
This isn’t always a sign that you are doing something wrong. Sometimes it simply means:
- market conditions changed
- volatility shifted
- your strategy is out of sync temporarily
This is called a drawdown — a temporary decline from your highest account balance.
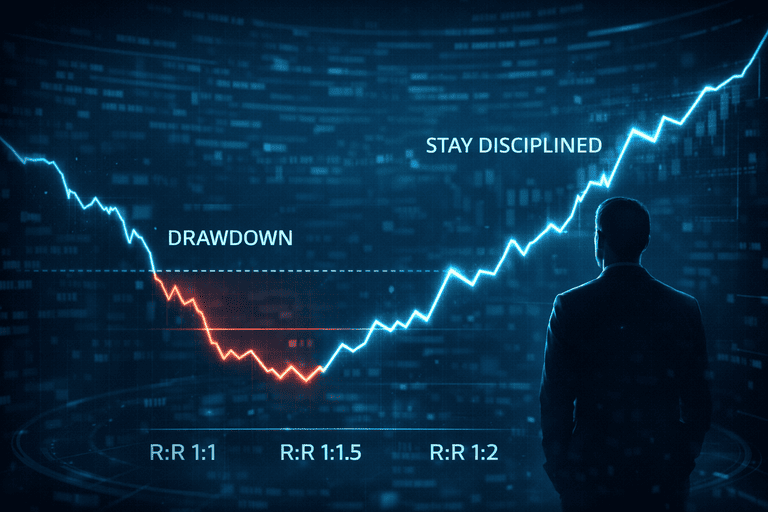
Why drawdowns destroy more traders than bad strategies
Most traders don’t blow up because of bad setups.
They blow up because they react badly to losing streaks:
- they double size to “win it back”
- they remove stops
- they increase leverage
- they jump between strategies every day
Instead of letting the math and discipline work, they panic.
What to actually do during a losing streak
Here are simple rules many professional traders follow:
- After 3–4 losses in a row: reduce position size
- After 6–7 losses in a row: stop trading for the day
- Review trades instead of forcing more trades
Your first job isn’t to make money — it’s to protect mental and financial capital.
When the market itself is the problem
Sometimes conditions are simply not worth trading. Low liquidity, random spikes, or heavy news events can turn good strategies into chaos.
That’s where market awareness becomes part of risk management.
If you want to understand when the environment is trending, ranging, or unstable, the AI dashboards can help give context — not signals, but clarity:
With losing streaks and drawdowns covered, we can now look at something even more subtle:
the hidden trading risks most people completely ignore.
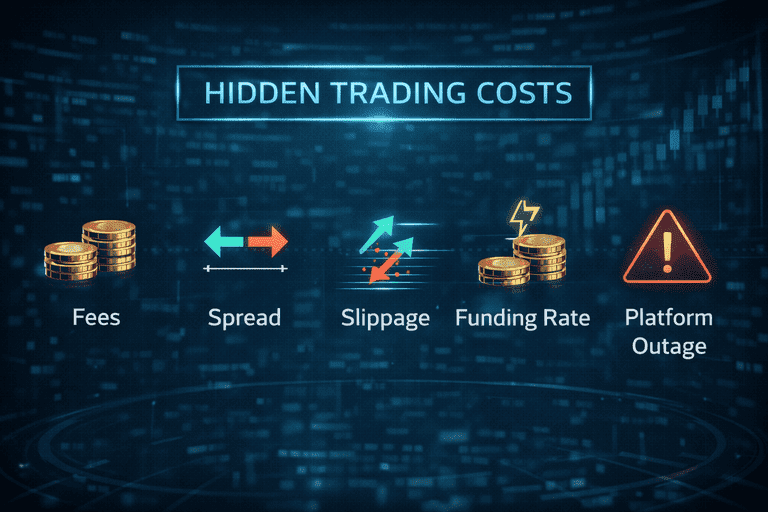
Even traders who understand stops, risk percentage, and position sizing still lose money for one simple reason:
they ignore the hidden costs and hidden risks built into the market.
These don’t show up immediately — but over hundreds of trades, they quietly drain performance.
1. Fees stacking up trade after trade
If you scalp, you open and close positions constantly. That means you pay fees constantly.
Even small fee differences between exchanges compound over time. Two traders with identical strategies can have totally different results simply because one chose a cheaper, more efficient exchange.
If you want to see how costs differ between platforms, the exchange comparison pillar breaks it down clearly:
Best Exchange for Scalping Crypto — Fees, Spreads, Execution (Compared)
2. Spread widening when you least expect it
The spread is the difference between buy price and sell price. During quiet times it can be tiny — during volatility it can suddenly expand.
When spreads widen, you can enter instantly in a small loss without realizing it. Over many trades, that adds up.
3. Slippage on fast moves
Slippage happens when your order fills at a worse price than you expected. In highly volatile markets, this is normal — but unmanaged, it increases risk.
4. Funding rates on perpetual futures
If you hold positions longer than a few minutes or hours, funding can slowly eat profit — especially during trending markets.
Monitoring funding helps you understand whether you’re paying to hold a position, or getting paid to hold one.
You can track current funding here:
5. Platform instability and outages
Exchanges sometimes freeze, slow down, or reject orders during extreme moves. If your entire trading plan depends on “everything always working,” you’re exposed.
Part of risk management is choosing platforms with liquidity, reliability, and strong infrastructure — not just bonuses and flashy banners.
6. Psychological fatigue
Sleep, stress, caffeine, alcohol, emotional problems — all of these influence decision-making.
Trading is mentally demanding. Treating it like a casino game dramatically increases risk.
Risk isn’t just math. It’s awareness, discipline, and environment.
Next, we’ll simplify everything with something practical you can actually use every trading day:
a short risk checklist.
Risk management shouldn’t live only in theory. It should guide every decision you make during a trading session.
Here’s a simple checklist many traders follow before pressing the button. You can adapt it to your own style over time.
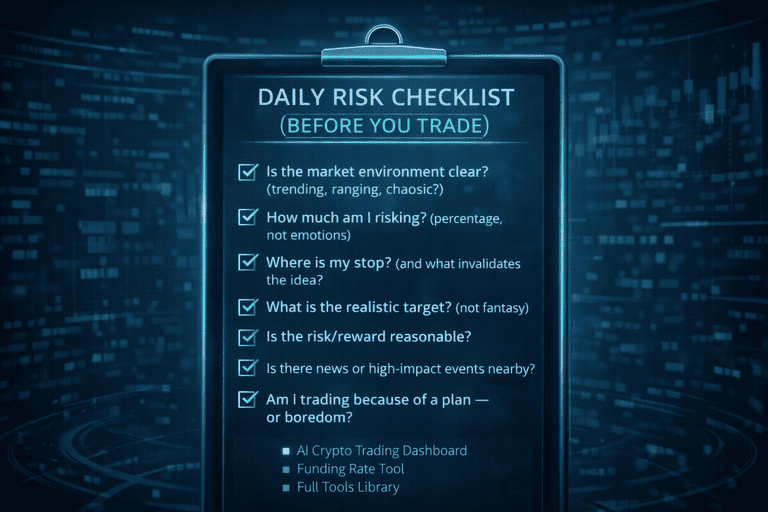
Before entering any trade, ask:
- Is the market environment clear? (trending, ranging, chaotic?)
- How much am I risking? (percentage, not emotions)
- Where is my stop? (and what invalidates the idea?)
- What is the realistic target? (not fantasy)
- Is the risk/reward reasonable?
- Is there news or high-impact events nearby?
- Am I trading because of a plan — or boredom?
If several answers feel uncertain, that’s usually a signal to slow down or skip the trade entirely.
Helpful tools to check environment and costs
You don’t need complicated dashboards, but certain tools make awareness easier:
- AI Crypto Trading Dashboard — understand bias, volatility, and trend context
- Funding Rate Tool — see whether funding is eating profit
- Full Tools Library — browse everything in one place
Use tools as support, not as trading signals. They help you see the environment — but you still manage risk yourself.
To wrap things up, let’s connect everything we’ve learned into one takeaway:
why survival is the real edge in crypto trading.
Most traders enter crypto because they want fast profits.
But the traders who actually last — and eventually become consistent — all discover the same lesson:
risk management is the real strategy.
You don’t need to predict every move. You don’t need the perfect indicator. You don’t even need to win every trade.
What you need is a structure that protects you when you’re wrong, keeps losses controlled, and gives your edge enough time to work.
If you feel like you’re still new or your foundation isn’t stable yet, these two guides connect perfectly with what you just learned:
And if you want to manage risk with more awareness, track conditions, and avoid hidden costs, our tools can help:

Just remember:
Tools assist. Rules protect. Discipline wins.
Trade small, be patient, stay objective — and give yourself the chance to grow.
13 thoughts on “Crypto Risk Management Strategies: How to Protect Your Capital Before You Trade”